
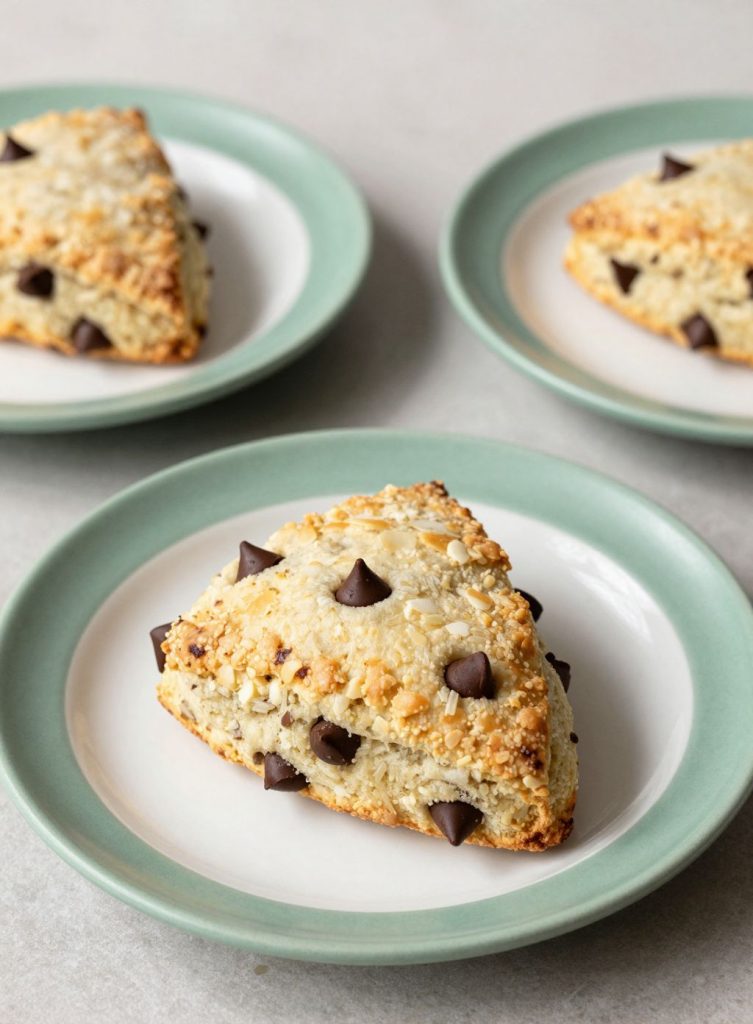
There’s something incredibly comforting about a warm scone, fresh from the oven, with a cup of coffee or tea. But what if I told you we could elevate that comfort to a whole new level? We’re talking about a scone that boasts a subtle tang, a tender crumb, and pockets of molten chocolate that make every bite an absolute dream. Yes, friends, today we’re diving into the wonderful world of Sourdough Chocolate Chip Scones.
Now, before you click away thinking “sourdough is too complicated,” hear me out! This recipe is designed to be approachable, even for those of you who might be new to the sourdough game. We’re not looking for a super-active, bubbly starter for this; in fact, this is a fantastic recipe to use up some of that sourdough discard that accumulates in your fridge. It’s all about adding incredible flavor and a delightful texture, not chasing an extreme rise.
Why Sourdough in Scones?
You might be wondering, “Why bother with sourdough in a scone?” And it’s a fair question! Most scones rely on baking powder for their lift. While we’ll still use a bit of that for an extra boost, the sourdough discard brings a few magical elements to the party:
- Depth of Flavor: This is the big one. The sourdough discard introduces a subtle, complex tang that complements the sweetness of the chocolate chips beautifully. It’s not overpowering; think of it as a sophisticated whisper that makes people say, “What is that amazing flavor?”
- Tender Crumb: Sourdough helps to tenderize the dough. The natural acids in the discard work their magic on the gluten, resulting in a scone that is incredibly soft and moist on the inside, without being heavy or dense.
- Extended Freshness: Sourdough baked goods often stay fresh longer than their conventional counterparts. While I doubt these scones will last long enough for you to test this theory (they’re that good!), it’s a nice bonus!
- No Waste Baking: This is perhaps my favorite reason. If you maintain a sourdough starter, you know the discard struggle is real. This recipe turns that “waste” into a truly delicious treat. It’s baking with purpose!
So, if you’re ready to transform your morning routine or your afternoon tea into something truly special, let’s get baking!

Recipe Card: Sourdough Chocolate Chip Scones
Ingredients
- 🛒 Ingredients
The Dry Base
- 2 ½ cups 300g All-purpose flour
- ¼ cup 50g Granulated sugar
- 2 tsp Baking powder
- ½ tsp Baking soda
- ½ tsp Salt
- ½ cup 113g Unsalted butter, very cold and cubed
The Liquid Mix
- ¾ cup 180g Sourdough discard, cold
- ½ cup 120ml Heavy cream, plus 1 tbsp for brushing
- 1 tsp Vanilla extract
- The Mix-ins & Topping
- 1 cup 170g Chocolate chips or chunks
- Optional: Turbinado sugar coarse sugar for topping
The Mix-ins & Topping
- 1 cup 170g Chocolate chips or chunks
- Optional: Turbinado sugar coarse sugar for topping
Instructions
🥣 Instructions
- Whisk Dry Ingredients: In a large bowl, whisk together flour, sugar, baking powder, baking soda, and salt.
- Cut in Butter: Add cold butter cubes. Use a pastry cutter or fingertips to work the butter into the flour until it resembles coarse crumbs with some pea-sized chunks remaining.
- Mix Wet Ingredients: In a separate jug, whisk sourdough discard, heavy cream, and vanilla until smooth.
- Combine: Pour the wet mixture into the dry. Fold gently with a spatula. When halfway mixed, add chocolate chips. Continue folding until a shaggy dough forms.
- Fold & Shape: Turn dough onto a floured surface. Pat into a rectangle and perform two “letter folds” to create layers. Shape into a 1-inch thick circle.
- Cut & Chill: Cut into 8 wedges. Place on a parchment-lined tray. Chill in the fridge for 30 minutes.
- Bake: Preheat oven to 400°F (200°C). Brush chilled scones with cream and sprinkle with coarse sugar. Bake for 18–22 minutes until deep golden brown.
- Cool: Let rest on the tray for 5 minutes before transferring to a wire rack.
💡 Baker’s Notes
- Don’t Overmix: If the dough looks a little “messy,” you’re doing it right! Overworking makes the scones tough.
- Keep it Cold: If your kitchen is hot, put the dough in the freezer for 10 minutes mid-way through shaping.
- Storage: Store in an airtight container at room temperature for 2 days, or freeze baked scones for up to 3 months. Reheat in a 350°F oven for 5 minutes for that “just-baked” texture.
Notes
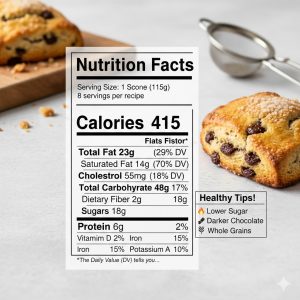
Nutrition Facts
Serving Size: 1 Scone (approx. 115g) Servings Per Recipe: 8| Amount Per Serving | % Daily Value* |
| Calories | 415 |
| Total Fat | 23g |
| Saturated Fat | 14g |
| Trans Fat | 0.5g |
| Cholesterol | 55mg |
| Sodium | 310mg |
| Total Carbohydrate | 48g |
| Dietary Fiber | 2g |
| Sugars | 18g |
| Protein | 6g |
Healthy Tips for Your Readers:
- Lowering Sugar: You can reduce the granulated sugar to 2 tablespoons without losing the structural integrity of the scone.
- Darker Chocolate: Using 70% dark chocolate chunks increases antioxidant content and reduces the sugar spike.
-
Whole Grains: You can swap up to 1 cup of the All-Purpose flour for Whole Wheat Pastry Flour for a boost in fiber and a nuttier flavor profile.
The Anatomy of a Perfect Sourdough Chocolate Chip Scone
Before we jump into the recipe, let’s talk about the key principles that will guarantee scone success. Making scones is less about precision kneading and more about gentle handling and cold ingredients.
1. Cold Butter is Your Best Friend: I cannot stress this enough. Cold butter, cut into small pieces, is crucial. As the scones bake, these cold butter pockets melt, releasing steam and creating those flaky, tender layers we all adore. If your butter is too warm, it will incorporate too much into the flour, resulting in a dense, cake-like scone rather than a light, flaky one.
2. Don’t Overmix: This is another golden rule for scones. Once you add the wet ingredients to the dry, mix just until everything comes together. A few streaks of flour are perfectly fine. Overmixing develops gluten, leading to tough scones. We want tender!
3. Sourdough Discard – The Star: For this recipe, your sourdough discard can be straight from the fridge. It doesn’t need to be active and bubbly. The older (within reason, a week or so is fine), the more tang it will impart. This is truly a “no-waste” baker’s dream!
4. The Right Chocolate: While any chocolate chip will work, I highly recommend using a mix of semi-sweet and dark chocolate chips, or even some chopped chocolate bars. High-quality chocolate makes a noticeable difference. Chocolate chunks also create those lovely pools of melted chocolate when you break open a warm scone.
5. Baking Powder’s Role: Even with sourdough, a little boost from baking powder ensures a nice, lofty scone. Don’t skip it!
6. Gentle Handling: From mixing to shaping to cutting, treat your dough gently. Think of it as a fragile cloud you’re coaxing into deliciousness.

Sourdough Chocolate Chip Scones: The Recipe
This recipe yields about 8-10 generous scones, depending on how you cut them.
Prep time: 20 minutes Chill time: 30 minutes (optional, but recommended) Bake time: 18-22 minutes
Ingredients:
- 2 ½ cups (300g) all-purpose flour, plus more for dusting
- ¼ cup (50g) granulated sugar
- 2 teaspoons baking powder
- ½ teaspoon baking soda
- ½ teaspoon salt
- ½ cup (113g) unsalted butter, very cold and cut into ½-inch cubes
- ¾ cup (180g) cold sourdough discard (100% hydration preferred)
- ½ cup (120ml) cold heavy cream, plus more for brushing
- 1 teaspoon vanilla extract
- 1 cup (170g) chocolate chips (a mix of semi-sweet and dark is great!)
- Optional: Turbinado sugar for sprinkling (for a crunchy topping)
Equipment:
- Large mixing bowl
- Pastry blender, two forks, or your fingertips
- Whisk
- Measuring cups and spoons
- Baking sheet lined with parchment paper
- Sharp knife or bench scraper
- Pastry brush (optional)
Instructions:
Step 1: Prep Your Dry Ingredients & Butter In your large mixing bowl, whisk together the flour, granulated sugar, baking powder, baking soda, and salt. Make sure everything is well combined. This ensures even distribution of your leavening agents.
Now, add your very cold, cubed butter to the dry ingredients. This is where the magic starts! Using a pastry blender, two forks, or your fingertips, cut the butter into the flour mixture. Work quickly to prevent the butter from warming up too much. You’re looking for pea-sized pieces of butter, some slightly larger, some slightly smaller. This texture is what creates those desirable flaky layers.
Step 2: Mix the Sourdough and Cream In a separate smaller bowl or a large measuring jug, whisk together the cold sourdough discard, heavy cream, and vanilla extract. The mixture will be thick and creamy. By mixing these wet ingredients beforehand, you ensure that the sourdough is evenly distributed throughout the dough without having to overwork the flour later.
Step 3: Combine and Add the Chocolate Make a well in the center of your dry ingredients and pour in the sourdough mixture. Use a large spoon or a rubber spatula to gently fold the mixture together. When it’s about halfway combined (you should still see plenty of loose flour), toss in your chocolate chips or chunks.
Continue to fold until a shaggy dough forms. It’s okay if it looks a bit messy or dry in spots—resist the urge to add more liquid just yet! The moisture from the butter and the sourdough will distribute as we shape it.
Step 4: The Fold and Shape Turn the shaggy dough out onto a lightly floured surface. Gently pat it into a rough rectangle. Now, here is a professional baker’s secret for extra flakes: The Letter Fold. Fold one third of the dough over the center, then the other third over that (like a letter). Rotate it, pat it down again, and repeat once more. This creates physical layers of butter and flour.
Step 5: Cut and Chill Using a sharp knife or a bench scraper, cut the dough circle into 8 even wedges (like a pizza). To get the best rise, try to press straight down with your knife rather than sawing back and forth; sawing can “seal” the edges and prevent those beautiful layers from expanding.
Now, here is the most important “patience” step: Chill the wedges. Place them on your parchment-lined baking sheet, leaving about 2 inches of space between them, and pop the whole tray into the fridge for at least 30 minutes (or the freezer for 15). Chilling relaxes the gluten and ensures the butter is rock-solid before it hits the heat. While they chill, preheat your oven to 400°F (200°C).
Step 6: The Finishing Touches Just before sliding the tray into the oven, brush the tops of the scones with a little extra heavy cream. This gives them a gorgeous golden sheen. For that professional bakery look and a delightful crunch, sprinkle a generous amount of Turbinado sugar (coarse cane sugar) over the top.
Step 7: Bake to Golden Perfection Bake for 18 to 22 minutes. You’re looking for a deep golden brown on the bottom and a light golden hue on the tops. The chocolate should be melty and the kitchen should smell like a dream.
Remove the tray from the oven and let the scones rest on the baking sheet for about 5 minutes. This allows the internal crumb to “set” so they don’t crumble when you pick them up. Transfer to a wire rack to cool slightly—though these are truly best served warm!
Pro-Tips for Scone Success
- The “Flour Spoon”: If you don’t have a scale, don’t scoop your flour directly with the measuring cup. This packs it down and leads to dry scones. Instead, spoon the flour into the cup and level it off with a knife.
- Discard Age: If your sourdough discard is very old (over 2 weeks), it might be quite acidic. You can add an extra tablespoon of sugar to the recipe to balance the tang.
- Freeze for Later: You can freeze the raw, cut scone wedges! When you’re ready for a fresh treat, just bake them straight from the freezer—just add 2-3 minutes to the total baking time.
Final Thoughts: A New Morning Tradition
There is something deeply satisfying about using sourdough discard. It feels like a small victory to turn a “byproduct” into a gourmet breakfast. These Sourdough Chocolate Chip Scones are the perfect bridge between a rustic bread and a delicate pastry—crusty on the outside, pillow-soft on the inside, and bursting with rich chocolate.
Whether you’re serving these at a Sunday brunch or grabbing one on your way out the door on a busy Tuesday, they bring a sense of intentionality to your day. They prove that you don’t need a professional bakery to enjoy world-class pastries; you just need a little bit of starter, some cold butter, and a love for the craft.
Happy baking, and I can’t wait to hear how your first batch turns out!